Showing posts with label geometry. Show all posts

Wednesday, September 14, 2011

A 'new' approach to geometric proofs

A brief follow on from the previous post on rediscovering Euclid.

Check this out for a 'new' teaching idea for presenting geometric proofs:


Euclid's proof of the equal angles in an isosceles triangle
(the famous Pons Asinorum),  as presented by Oliver Byrne in 1847.
Image from the Oliver Byrne image project at the University of British Columbia

This comes from the amazing 1847 Oliver Byrne version of Euclid's Elements. I'm thinking a page or two from this image library will make for a great exploration activity with my Year 9 class currently learning about geometric proofs and congruent triangles.

Of particular interest to modern educators is Oliver Byrne's introduction where he argues:
"Illustration, if it does not shorten the time of the study, will at least make it more agreeable. This work has a greater aim than mere illustration ; we do not introduce colours for the purpose of entertainment, or to amuse by certain combinations of tint and form, but to assist the mind in its researches after truth, to increase the facilities of instruction, and to diffuse permanent knowledge." (Byrne, 1847, p vii)
and continues with a decidedly modern take on how using visual imagery aids memory retention and understanding. I love how he denies this is merely a form of entertainment - anticipating the charge of  "mathotainment" sometimes cast on alternative teaching approaches today.

Read the full story at http://www.math.ubc.ca/~cass/Euclid/byrne.html. The German publisher Taschen has recently published a facsimile copy of the work - mine is on order from Amazon!

Tuesday, September 13, 2011

Euclid who?


Raphael "School of Athens" - detail showing Euclid.

I caught myself out again today - (see future post : "Assume : making an ass out of you and me") : I assumed my students, and indeed my colleagues, knew the wonderful story about Euclid and his five postulates. Assumed they knew how our high school geometry is built on the foundation of these five unprovable axioms. But I'm of course being unreasonable and unfair - Euclid isn't in our school syllabus any more.

While we still ask our top students to replicate and develop geometric proofs, Euclid and the idea of axioms is effectively removed from the content.  There is just a single reference to the word 'axiom' in our syllabus - a background note tucked away in the NSW Board of Studies 7-10 Mathematics syllabus (p161): "The Elements of Euclid (c 325-265 BCE) gives an account of geometry written almost entirely as a sequence of axioms, definitions, theorems and proofs. Its methods have had an enormous influence on mathematics. Students could read some of Book 1 for a far more systematic account of the geometry of triangles and quadrilaterals."   Fortunately these precious words survive on in the new 'Australian Curriculum' version of our syllabus.

But  I wonder. What have we done? Why did we keep the formalism of doing proofs, keep our students busy with it for months of syllabus time while letting go of one of the most powerful ideas in mathematics: the idea of proof built on axioms?  How will our students relish those mind-blowing moments in their future when they encounter parallel lines that do meet, or better yet, encounter Godel or sit in a philosophy class wondering how we know something*, if they don't first meet Euclid? 

And sad to say, I had to confess to myself I couldn't actually remember those five postulates. So it was time for a visit to Wikipedia.  

And then I discovered something I hadn't seen before: 


The Pons Asinorum 
aka "the isosceles triangle theorem"

I smiled.  It was if Euclid himself was winking at me across the millennia. So tomorrow my class is exploring the idea of axioms and getting a history lesson! And like students of many generations past, I think they will appreciate the humour of the Bridge of Assess.


Two interesting resources for The Elements:
A full digital copy of  Oliver Bryne's 1847 famous pictorial version of the Elements (most of the proofs are done without words) is at http://www.math.ubc.ca/~cass/Euclid/byrne.html.  This could make an interesting source document for students.

A good explanation and commentary from David E Joyce http://aleph0.clarku.edu/~djoyce/java/elements/bookI/propI5.html - who has an amazing website exploring the whole contents of the Elements.


* Say it quietly : epistemology.

Wednesday, July 6, 2011

I see parallelograms everywhere

Having come to terms with the area of the triangle - and realising how parallelograms unlock the secrets of so many of our basic regular shapes ....


... it's time to look at our friend the trapezium (or trapezoid if you insist). 

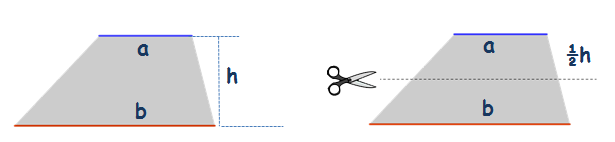
Can you turn this into a parallelogram? And how does it help work out the area?


Try it out, before clicking to see more. A teacher resource is also provided at the end of the post.

Tuesday, July 5, 2011

Really, really understanding the area of a triangle (Part 2)

Continuing from Part 1, we look for an elegant and convincing way to demonstrate to students that our triangle ideas also apply to the infamous (and well named) obtuse triangle. 

How can we show that the area of this triangle is the same as half the area of the rectangle made using the base and height of that triangle? I struggled with this - and it turns out drawing a rectangle was not the best way - the secret is to turn this triangle into a parallelogram. 


Here is a neat trick:

By rotating our obtuse triangle, and putting it on top of our original obtuse triangle, we now have a parallelogram. The parallelogram area is base times height, so the area of our obtuse triangle is just half that! Woot!

So long as we are solid in the knowledge that the area of a parallelogram is the base times the height - we are there : clearly the area of even the obstuse triangle is half the base times the height!

Just one small problem ... have we taught parallelograms yet?

Should we change the order we teach area?
Realising how central the parallelogram is to gaining a deep understanding of quadrilaterals and now even triangles, has led me to wonder about the classic teaching sequence for this topic.

The classic sequence for area is:


We start with a very specific rectangle 'the square', then extend to the rectangle, switch to a completely different shape, then are back to another quadrilateral. No wonder we have these puzzled looks when we say a square really is a rectangle, especially when in some textbooks the formulas are even written using different letters, and students are puzzled why some area formulas have that half factor and others don't. And we haven't even looked at the trapezium yet - which uses the half in yet another way!

So - with the goal of students better seeing the relationship between all these shapes and their areas, I'm going to try this sequence next time:


Why?
  • Rectangles make sense to most students, the math is very simple - so we can focus on the real meaning of area as a measure of 2 dimensional space. Understanding what area is, and how it is different from length and volume is non-trivial - it's quite a deep teaching - and well worth quality time.
  • We look at squares as an aside - so it's clear the square is 'just' a special rectangle.  This is time for a discussion of 'all squares are rectangles, but not all rectangles are squares". My students liked this version: "All crows are birds, but not all birds are crows".
  • We then move to parallelograms.
    • What makes it a parallelogram?
    • Now we focus on what happens to the side lengths as we change the angles while the height remains constant. What happens to the side length?  How does it compare to the height?
    • We draw a bounding rectangle and show that so long as the height and base stay unchanged, the area is also unchanged. We can show this with guide lines, and through demonstration or student exploration with a dynamic geometry tool such as GeoGebra.  Keep the focus on the height - this will pay off soon.
    • We then observe that when the angle is 90 degrees we have a rectangle - so a rectangle is just a special parallelogram - which explains why the area formula is the same!
    • ... and when the side lengths are just right, we have a square - wow- that's a parallelogram too! Same formula.
  • And now we are ready for triangles.
    • Compare triangles to quadilaterals - so it's clear how they are different.
    • Explore the area of an acute triangle using the rectangle as the base to develop the 'half' part of the formula, and emphasise the triangle height.  Don't start with a right triangle - it allows students to think the height is the same as the side length!
    • Extend the idea to show how triangle area can be explained in terms of a parallelogram made by reflecting the triangle on a side. Now we can show the area calculation is also true for obtuse triangles.
    • Now hammer home the calculation methods - with clear focus on the height versus the length of the side. Make sure students do the right thing, even when given a triangle with all three side lengths and a height provided. And now is the time to look at algebra issues students may be having
  • And finally, go back and look at our rectangle again:
    • Time for a deeper understanding of what happens when you change the units of measurement,
    • And time to get a good physical sense for how big a square metre actually is - and why you can fit 10,000 square centimetres into just 1 square metre.
So in this sequence, we use the parallelogram as our central organising concept.


The rectangle and the square are special parallelograms - all using the same area formula : base times height. We can see triangles in terms of being two halves of a rectangle (this is the simplest), with the fallback of knowing the parallelogram is the secret for understanding why this also works for the obtuse triangle. And with the parallelogram well understood, and our technique of seeing areas in terms of rectangles, we are ready for our next set of friends: the trapezium, the rhombus and the kite.

Monday, July 4, 2011

Really, really understanding the area of a triangle (Part 1)

We all learnt this one at school - recite with me : "The area of a triangle is half base times the height", and then the teacher wrote on the board:  and then the students practiced endless boring substitutions, triangle after triangle after triangle.

But how many of our students really understand what is happening? What is the height? Where does the half come from? Why are we multiplying by a half - aren't we dividing by two? And what's with that strange  obtuse triangle?

Observe how these diagrams are almost monochrome
making it all that harder to explain the ideas.

After spending several weeks with Year 8 and Year 11 classes exploring the challenges of teaching and understanding area of the triangles, it's become very clear to me that many students are going all the way through high school without ever really 'getting it' - which is a pity because the idea is so wonderfully powerful and actually quite simple when you strip away the ornamentation.

Here are the lessons my students taught me about being a better teacher of triangle geometry:

Understanding the key idea is easy - for right triangles and acute triangles
So long as your students are happy with the formula for the area of a rectangle, the logic of the "half the base times the height" formula is stunning clear:


The 'wow' noises that came from the class showed the power of these diagrams! Even better if you have a dynamic geometry tool like GeoGebra. It's just so clear the area of the triangle is half the area of the bounding rectangle. 

That's so obtuse!?!
The hard part came when we looked at obtuse triangles. I am deeply ashamed to confess my bag of tricks was empty at this stage and I had to resort to saying: "Well, the formula works the same for obtuse triangles - trust me!" (blush).  Demonstrating this result using a dynamic geometry drawing tool, comparing the bounding rectangle area to the triangle area didn't quite cut it.

Extra work is needed to understand the diagrams
Many of my students really struggled with the height markings on the obtuse triangle. I think in part because I was initially using monochrome diagrams, and in part because the idea of the 'height' of triangle (as opposed to the length of the sides) wasn't clear.  Here is what I'm going to do next time I first show this diagram ...

Many students don't understand what that dotted line is all about.
Replacing it with a ruler, and explaining the idea of triangle height
 better helped understanding.

Extra work is needed to explore the idea of the 'height' of a triangle

... and at the same time as showing the diagram, we need to reinforce thinking about the difference between the length of something and its height above the ground. Here's what seemed to work: I started by standing tall,  asking how high my head was, and then I leaned over - was my head still as high? No. Then I made a triangle using a school desk as my base, and a stick (a long ruler) as one side of my triangle. I put the ruler vertically on the desk, so it was clear the height = length of the ruler. Then I leaned the ruler over at an angle and asked what the height was now? Some wonderful students jumped up, grabbed another ruler to measure the height. Another look at the diagram of the obtuse triangle with the height marked, and more 'Aha' light bulbs going off!  Next time I'm going to use a loop of string wrapped around the desk to make my dynamic triangle.

Don't assume students are comfortable with the standard formula
I made the mistake of assuming students would be happy with 'half base times height' expressed as  . I was wrong! I heard several students asking - "Why are you multiplying by a half? Why not multiply base times height and divide by two?". And another "Huh? Doesn't multiplying make something bigger?".  For the time being, I'm letting students write or even  . We'll save that story for another day!

And the obtuse triangle?
So is there are easy way to show how an obtuse triangle fits into half the base times height? It turns out there is!  Here's a hint:

Another way to explore triangle area - turn it into a parallelogram. So powerful it works for obtuse triangles too! Image: Wikipedia Triangles article, by Herbee
The idea is so powerful, I'm now seriously thinking we are teaching area of shapes in the wrong order. But that's for Part 2.

With many thanks to my Year 8 students who felt safe and secure enough to ask every possible question - and more - they had about area, triangles, multiplication and algebraic expressions.

Monday, June 13, 2011

No geometry, no banana!

One of my math heroes, Michael Atiyah describes how mathematics is often partitioned between algebra and geometry, but warns about the seductive power of relying exclusively on algebra. In that colourful tone of his, he writes:

With apologies to South Park.
"Algebra is the offer made by the devil to the mathematician. The devil says: `I will give you this powerful machine, it will answer any question you like. All you need to do is give me your soul: give up geometry and you will have this marvellous machine.’”
Atiyah (2001)

When I was a young student, while I found Euclidean geometric proofs fascinating (yes - I was a math nerd), the glory of Algebra - the revelation of being able to work with symbols and expressions blinded me to anything else. Perhaps it was because I'm not that spatially aware (as my long suffering World of Warcraft guild mates found out this weekend when I kept running into the fire breathing dragons despite repeated deaths...) - but I just took to algebra like a duck to water. And then I discovered coordinate geometry - who needed shapes anymore? I could turn every geometry problem I met into an algebra problem .. even it if was a bit messy sometimes!

However while relearning mathematics 20(ish) years later as part of my post-graduate teaching degree, I discovered the joy and elegance of the geometric view. So many ideas, including algebraic ideas, are clearer, easier to learn and remember when seen geometrically. As Lockhart points out - how much more interesting is the area of a triangle when seen geometrically as a half rectangle, as opposed to a formula learnt by rote? 

Now that I'm teaching maths, I'm exploring what happens when we use geometry to help understand algebra. It was interesting to observe my top Year 9 class when set the task to explain the "difference of squares" using a geometric argument:


I handed out sheets of coloured paper and scissors, but how they resisted! Some drew small sketches of the idea, but just refused to cut out accurate representations and manipulate the shapes. I chuckled at their resistance, because I knew that's what I would have done in my school days - the algebra is 'obvious' - what's the point? We got there in the end - no doubt that will be recorded as one of those 'weird activities' I made them do :-)

Does using a geometric demonstration help learn ideas? Absolutely! I have no difficulty remembering the formula for the sum of angles in a polygon now, because I can see the triangles arranged inside it; I feel the triangle area formula - and now even the odd looking rhombus area formula is in my bones - because I can see the triangles; and the difference of squares - well it's just so clear; and you absolutely know that  because you can see it in the diagram - those two extra bits are in there!

So many ways understanding the geometry helps understanding the forumulae!
Click for a larger view
Michael Atiyah was right when he said that having to choose between algebra and geometry is like asking someone if they would rather be blind or deaf : "On the whole we prefer to have both faculties" (Atiyah, 2001).


Atiyah, M. (2001). Mathematics in the 20th Century: geometry versus algebra, Mathematics Today, 37(2), 46- 53.

Illustrations made in PowerPoint, GeoGebra and Paint. GeoGebra is an important part of the solution to breaking down the false dichotomy between algebra and geometry - a very good reason to use it in class!

Answer to difference of squares problem: Cut the top green rectangle into the two obvious pieces, rotate the narrow green piece to line it up below the larger green piece. The area covered is very clearly